Ecommerce
How to Add Virtual Try-On to Your Shopify Store
Step-by-step guide to add virtual try-on to your Shopify store: install and configure Looksy, prepare product data, customize the widget, and track performance.

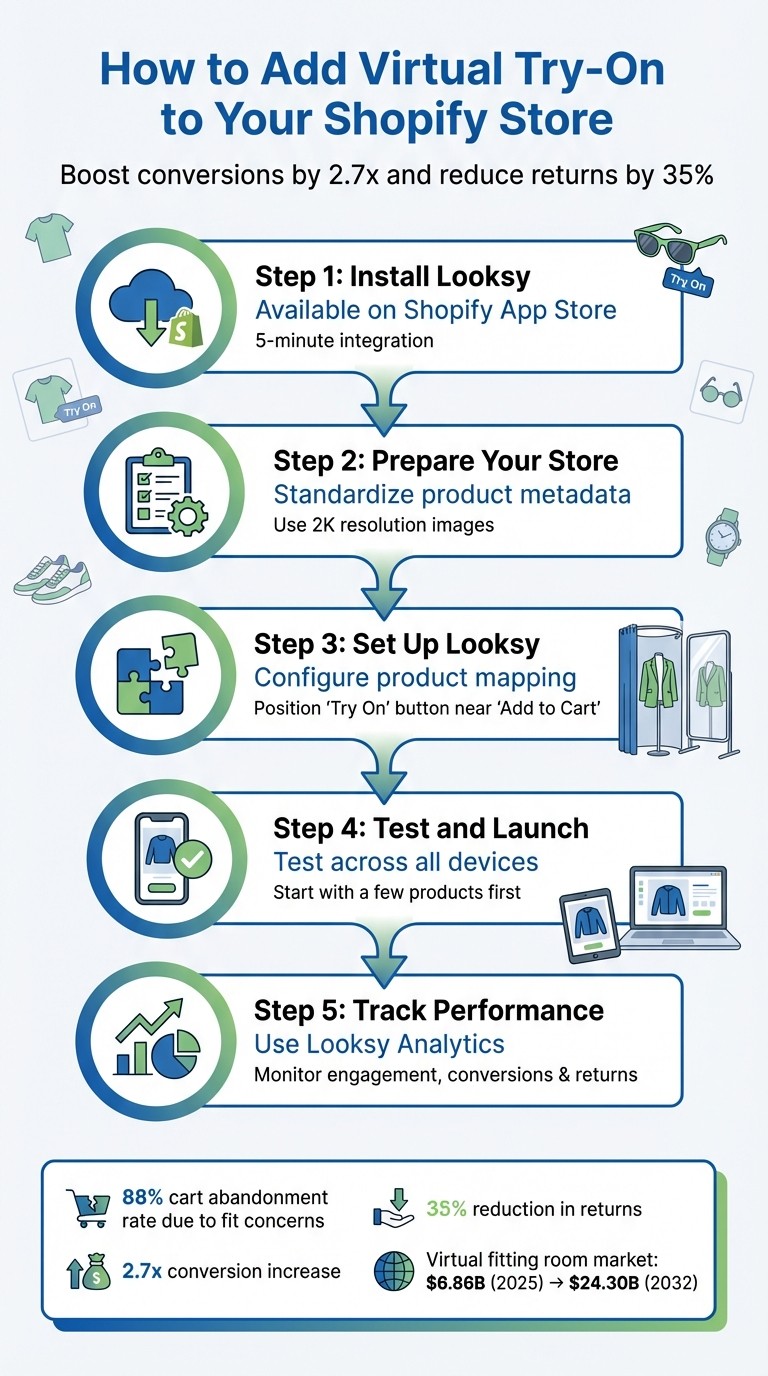
Online shoppers abandon carts at an alarming rate - 88% - mainly due to concerns about fit and style. Virtual try-on (VTO) technology solves this by letting customers preview products like clothing and accessories on themselves using AI and augmented reality. Tools like Looksy can boost conversions by 2.7x, reduce returns by 35%, and even increase add-to-cart rates by up to 600%. This guide will show you how to integrate Looksy with your Shopify store, from setup to tracking its impact.
Key Steps to Add Virtual Try-On:
Install Looksy: Available on the Shopify App Store, it integrates with your store in 5 minutes.
Prepare Your Store: Standardize product metadata (e.g., “waist_inch”) and use high-quality images (2K resolution).
Set Up Looksy: Enable which products, customize the widget.
Test and Launch: Test across devices, starting with a few products, before expanding storewide.
Track Performance: Use Looksy Analytics to monitor engagement, conversions, and return reduction.
With the virtual fitting room market expected to grow from $6.86 billion in 2025 to $24.30 billion by 2032, now is the time to implement this technology and give customers confidence in their purchases.
5-Step Guide to Adding Virtual Try-On to Your Shopify Store
What Virtual Try-On Is and Why It Matters for Shopify
What is Virtual Try-On?
Virtual try-on (VTO) uses artificial intelligence (AI) to let customers see how products look on them using their own photo or a live camera image. Instead of placing items on a generic model or avatar, the system maps key body or facial points on the user and digitally applies the product to their image, creating a realistic preview of fit and appearance. This removes much of the guesswork from online shopping [3].
Here’s how it works: the customer uploads a photo or uses their camera, and the AI analyzes proportions and positioning to place the product accurately on their body or face. For Shopify merchants, VTO is added through apps that integrate with Shopify’s media library and the Storefront API, making it easy to enable virtual try-on directly on product pages [3][4].
Benefits for Shopify Merchants
VTO transforms online shopping into an engaging, interactive experience. When customers can see themselves wearing or using a product, they’re more likely to spend extra time on your site and feel confident enough to make a purchase. Statistics back this up - customers engaging with 3D media are 44% more likely to add items to their cart and 65% more likely to complete a purchase when using AR.
The financial benefits are hard to ignore. Products featuring 3D or AR technology experience a 94% higher conversion rate compared to those without. Beyond boosting sales, VTO helps reduce costly returns - expected to surpass 19% in 2025 according to the National Retail Federation. Some merchants have even reported a 64% reduction in returns, thanks to VTO’s ability to minimize sizing uncertainty. With the global virtual fitting room market projected to grow from $6.86 billion in 2025 to $24.30 billion by 2032, adopting this technology early can set Shopify merchants apart in a competitive ecommerce environment.
US Market Considerations
For US-based customers, tailoring your VTO setup to local standards is essential. This means using imperial measurements - like inches and pounds - instead of metric units. For example, waist sizes should be shown in inches, and clothing sizes should follow the familiar US system (e.g., 0-20 or S-XL).
Currency formatting is another key detail. US shoppers expect prices to appear as $XX.XX, with the dollar sign preceding the number and a decimal point separating dollars from cents. To ensure this, adjust your Shopify settings under Settings > General > Standards & Formats. Additionally, standardizing size chart attributes - using consistent names like “waist_inch” - helps the AI provide accurate fit predictions and avoids errors in sizing logic.
With these adjustments in place, your Shopify store will be ready to deliver a VTO experience that feels intuitive and tailored for US consumers. This preparation will also make it easier to integrate tools like Looksy to enhance your store’s functionality.
Preparing Your Shopify Store for Looksy
Getting your Shopify store ready for Looksy is all about ensuring your product data is well-organized and accurate before installation.
Since Looksy integrates seamlessly with your existing Shopify setup, all you need is a functional Shopify store to get started. But before diving in, take a few steps to optimize your data.
First, focus on standardizing your product metadata. For instance, if you’re listing waist measurements, use consistent labels like “waist_inch” across all products. This uniformity minimizes errors and helps Looksy’s AI deliver precise sizing recommendations for your customers.
Next, review your product images. Make sure you have high-resolution photos - ideally 2K resolution - captured from multiple angles (front, side, and back) in neutral lighting. These high-quality images enable Looksy’s AI to showcase realistic fabric textures, colors, and proportions during virtual try-ons.
If you’re launching a new or trial store, double-check that your storefront password settings allow for testing before going live. For stores using 3D models, keep file sizes under 5MB and ensure they have fewer than 50,000 polygons. This keeps rendering smooth, especially on mobile devices.
Lastly, test your store’s mobile responsiveness. The virtual try-on feature should display perfectly on smartphones to provide a seamless customer experience.
Once these steps are complete, you’re all set to install Looksy and offer your customers an engaging virtual try-on experience.
How to Install and Configure Looksy on Shopify
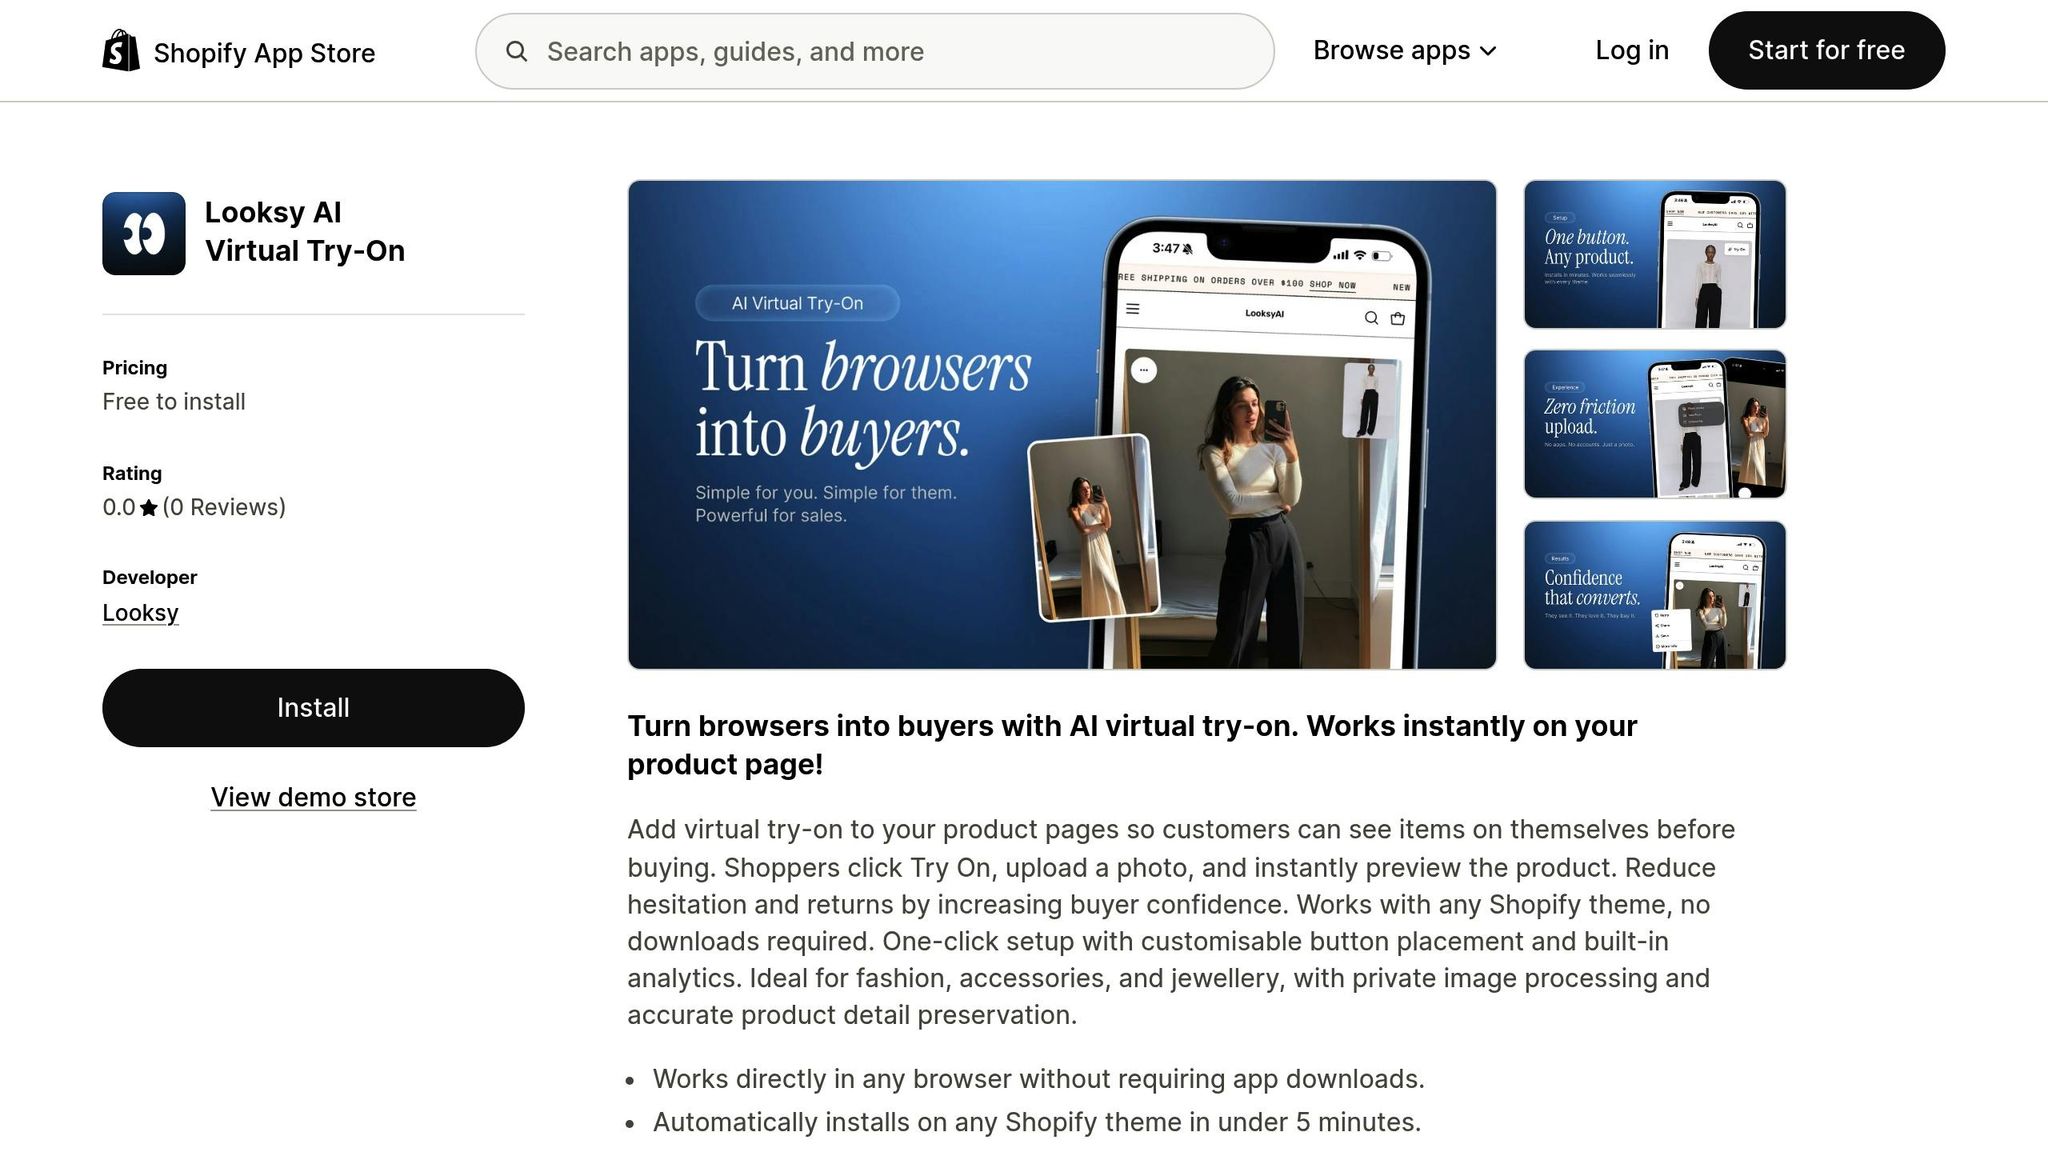
Installing Looksy from the Shopify App Store
To get started, head to the Shopify App Store, search for “Looksy”, and click the install button. You’ll need to authorize access to your product catalog and theme data, but don’t worry - this process is quick and takes about 5 minutes.
Once permissions are granted, Looksy installs seamlessly without requiring any coding or complicated setup. It’s fully compatible with any Shopify theme and won’t impact your site’s speed. The app uses non-blocking JavaScript, meaning it only loads when a customer clicks the try-on button. You can test the feature with 20 free try-ons included in every account to see how accurately the AI renders your products.
After installation, you’ll need to configure product mapping and widget settings to ensure everything runs smoothly.
Setting Up and Mapping Products
Once installed, Looksy automatically syncs all your active products - no need for manual mapping. It also inherits your store’s existing currency and language settings, so there’s no extra work on your end. You don’t have to tag specific collections or tweak complicated settings; Looksy takes care of everything in the background once permissions are in place.
The app offers different pricing plans based on your needs. The Starter plan costs $29.99/month and includes 200 try-ons, while the Growth plan at $79/month provides 600 try-ons plus advanced analytics. Throughout this process, your product data stays secure, and customer photos are processed instantly via a secure API. Nothing is stored - everything is deleted immediately after processing.
Customizing the Looksy Widget
The Looksy widget blends effortlessly with your store’s theme. It automatically matches your existing design, including colors, fonts, and styling, so you don’t have to fiddle with CSS.
For those needing more advanced customization, the Enterprise tier offers options like custom button placement, branded loading screens, and white-labeling. You can also adjust the email capture messaging within the try-on flow to align with your brand’s tone. And don’t worry about performance - Looksy delivers try-on results in about 3 seconds, ensuring a smooth experience for your customers.
Adding Looksy to Your Product Pages
Using the Shopify Theme Editor
Start by heading to your Shopify Admin. From there, go to Online Store > Themes and click Customize on your active theme. In the top dropdown menu, select Products > Default product to bring up the layout for your product pages.
The widget will automatically match your store’s design, blending in naturally with the rest of your page.
The process is quick and doesn’t require any coding. For those looking for more advanced adjustments, manual embedding is also an option.
If you’re unsure about rolling it out to your entire store, consider enabling Looksy on a few high-traffic products first. This allows you to monitor its performance before making it available across all product pages.
Adjusting Settings and Tracking Performance
Customizing Try-On Options
Looksy seamlessly integrates with your Shopify store by adopting your existing theme’s styling. This means the try-on button naturally matches your brand without requiring any CSS adjustments. The result? A tool that feels like a natural part of your store rather than an awkward add-on. For those looking for more advanced tweaks, the Enterprise tier offers extras like white-labeling, custom button placement, and branded loading screens.
Placement of the “Try On” button is crucial. Looksy keeps it on the product image. This is the most natural place for customers to use Try On.
Once you’ve finalized your customizations, the next step is to measure how well they’re working with Looksy Analytics.
Using Looksy Analytics
After setting up your try-on options, it’s time to dive into the numbers. Looksy Analytics, available from the Growth tier ($79/month), provides insights into three key areas: engagement (how often the tool is used), conversion (its impact on sales), and return reduction (accuracy in fit).
Typically, engagement rates hover between 2% and 5% of visitors. But here’s the exciting part: merchants using Looksy report a 2.7x increase in conversions for fashion and accessory products, along with a 35% drop in size-related returns. These stats are based on data from over 10,000 try-on sessions. Keep a close eye on metrics like engagement rates to gauge visibility and track add-to-cart rates immediately after try-ons to measure purchase intent.
Also, monitor details like time-to-interaction and exit rates to ensure the Looksy widget loads within 3 seconds. Faster load times mean better user experiences. On top of that, you can use try-on data to create personalized retargeting campaigns via email or SMS, targeting customers based on the styles and sizes they explored.
Connecting Looksy Data with Shopify Analytics
Once your try-on settings are fine-tuned, connect the insights to Shopify Analytics for a deeper understanding of Looksy’s impact on your sales. By comparing conversion rates of shoppers who used the try-on feature versus those who didn’t, you can calculate the “true lift” - a clear measure of the tool’s added value.
For stores with high sales volumes, the Scale tier ($199/month) offers API access. This allows you to pull try-on data into custom dashboards or business intelligence tools for even more detailed analysis. Enterprise customers benefit from having a dedicated success manager to help integrate Looksy data with analytics platforms. Use Shopify’s analytics to identify high-intent segments - like shoppers who tried on items but didn’t purchase. These groups are perfect for retargeting campaigns.
Testing, Maintaining, and Scaling Looksy
Testing Before Launch
Before rolling out Looksy, it’s smart to test it in a Shopify staging theme. This approach lets you spot any layout glitches or bugs without impacting real customers. Start small by enabling Looksy on just 3–5 high-visibility products or testing it within a single category. This helps you evaluate setup simplicity and load times.
Make sure the try-on experience works seamlessly across iOS, Android, and desktop devices. Check that product visuals display accurate colors, textures, and scaling to ensure a realistic experience. Keep asset file sizes optimized for quick loading.
During this phase, confirm that privacy badges are visible and that accessibility prompts, like “move closer”, are easy to spot. Once everything runs smoothly in staging, you’re ready to move forward with maintaining and monitoring its performance.
Keeping Looksy Running Smoothly
After a successful launch, ongoing maintenance is key. Conduct quarterly audits to ensure Looksy continues to meet your standards.
Track metrics like conversion rates, reduced returns, and user interaction times to measure the tool’s impact on your business. Equip your customer support and marketing teams with Looksy analytics so they can identify which styles or sizes are driving the most engagement. To optimize performance, use content delivery networks (CDNs) and pre-fetch metadata to speed up AR rendering.
Scaling with Looksy
Once Looksy is running smoothly, it’s time to think about scaling. Use flexible, month-to-month billing to accommodate peak seasons, scaling up as demand increases and adjusting during slower periods. Higher-tier plans are available to support growing traffic, offering features like more try-ons and API access for custom integrations.
The Looksy API can simplify scaling by automating product mapping and managing try-on data efficiently. For enterprise users, additional perks like a dedicated success manager, custom integrations, and white-labeling options are available. You can expand Looksy’s reach by embedding try-on links into Instagram and Pinterest posts or by adding QR codes to physical retail spaces. To maintain quality as your catalog grows, set clear asset standards.
Conclusion
Integrating Looksy into your Shopify store is quick and straightforward. In just about 5 minutes, you can install it directly from the Shopify App Store with a single click. After installation, you’ll map your products, customize the widget to align with your brand’s style, and position the “Try On” button where shoppers can easily access it. Once live, many fashion and accessory retailers report noticeable boosts in conversions and fewer returns.
With 88% of shoppers leaving their carts due to concerns about fit and style, virtual try-on technology tackles one of the biggest hurdles in online fashion shopping. By giving customers the ability to visualize products before purchasing, you’re helping them shop with confidence - turning hesitation into action.
Start by taking advantage of the free trial, which includes 20 try-ons, to see how Looksy’s AI-powered rendering works for your store. From there, the Starter plan at $29.99/month offers 200 try-ons, allowing you to test the feature on your most popular products. As your business grows, you can easily scale up to accommodate higher demand.
To make the most of Looksy, use its analytics to fine-tune your inventory and marketing strategies. Highlight the virtual try-on feature through homepage banners, social media posts, and email campaigns to drive engagement. With the virtual fitting room market growing rapidly, now is the perfect time to give your customers the confidence they need to complete their purchases.
The tools are ready, your customers are eager - install Looksy today and turn casual browsers into loyal buyers.
FAQs
How does virtual try-on technology help customers feel more confident when shopping online?
Virtual try-on technology uses artificial intelligence (AI) to show shoppers how products like clothing, accessories, or makeup look on their own photo or live camera image before making a purchase. Instead of using generic models or avatars, the system maps key facial or body points and digitally applies the product to the shopper’s image, creating a realistic preview of fit, style, and proportion.
This personalized fitting-room experience reduces guesswork around size, color, and overall look, helping customers make more confident buying decisions. As a result, shoppers are more likely to complete purchases and less likely to return items due to fit or appearance issues.
How can I prepare my Shopify store for integrating Looksy Virtual Try-On?
To get your Shopify store ready for Looksy Virtual Try-On, here’s what you need to do:
Make sure your Shopify store is active: You’ll need an operational Shopify account to get started - no extra platforms or accounts are necessary.
Polish your product pages: Ensure your product pages have clear, high-quality images and a consistent layout where a button can be easily added.
Install the Looksy app: From your Shopify admin, add the Looksy Virtual Try-On app. The installation is quick and typically takes just about 5 minutes.
Set up the “Try-On” button: Configure the app to display a “Try-On” button by enabling the app embed. Shoppers can use this feature without needing to sign up for an account.
Test it out: Click the button, upload a photo, and check that the virtual try-on preview works smoothly.
Go live and keep an eye on things: Publish the changes once everything is working perfectly. Monitor customer interactions to ensure they’re having a seamless experience.
These steps will give your store an interactive edge, allowing customers to virtually try products before they buy.
How can I measure the impact of Looksy on my Shopify store’s sales?
With Looksy’s built-in analytics dashboard, tracking key performance metrics becomes a breeze. You can monitor improvements in conversion rates, which could potentially see a 2.7× boost, and observe a notable decrease in size-related returns - often averaging around 35%. The dashboard also provides insights into how the virtual try-on feature encourages quicker purchase decisions, typically within just 15 seconds.
By comparing these data points with your Shopify store’s baseline reports, you’ll clearly see how Looksy is driving sales and improving the overall shopping experience for your customers. These metrics make it easy to measure the impact Looksy has on your business.